Introduction
Performing dissolution testing isn’t just about following a standard protocol it’s about ensuring accuracy, reproducibility, and regulatory compliance every single time.
This practical guide is designed specifically for QC and R&D analysts who already know the basic theory, but need a reliable, real-world walkthrough on how to perform dissolution tests step by step in a pharmaceutical laboratory.
In part 1 we began with a Guide for beginners and fresh graduates about dissolution testing including basic concepts and definitions, Read more
In this article you will learn:
Whether you work in a high-throughput QC lab or an R&D environment optimizing formulations, this guide aims to bridge the gap between official guidelines and daily lab practice — so you can run dissolution tests confidently, consistently, and in full compliance.
Understanding the Objective
Before starting any dissolution test, clarify and document why you’re performing it and what the test must demonstrate.
This step helps you: , apparatus, sampling times, and acceptance criteria and avoids repeating work later.
Define the goal of the test
- Routine QC test: Checking that each batch meets finished product specifications (e.g., “Q = 80% in 45 min”).
- Formulation development / R&D: Comparing different prototypes, studying release mechanisms, or supporting stability studies.
- Method development / validation: Setting up a new method, assessing robustness, precision, or specificity.
Identify the regulatory framework
- Which pharmacopoeia applies? (USP, EP, JP, IP)
- Are there specific FDA, ICH, In-House SOPs that override or add to general methods?
- For generic products: Do dissolution tests support bioequivalence or in vitro–in vivo correlation (IVIVC)?
Select Test Type & Design
Depending on the goal, decide:
- Single-point vs. multi-point test: QC often uses a single Q-point (e.g., 80% at 45 min), R&D uses a full profile.
- Apparatus: Basket, paddle, or others depends on dosage form, product behavior, and regulatory requirements.
- Sampling strategy: Number of time points, replicate units, and replacement of media.
Define Acceptance Criteria & Documentation
- Confirm official acceptance criteria (e.g. Stage 1, Stage 2 per USP <711>).
- Record in the protocol or batch record: product name, strength, lot number, dissolution method number or reference, media details, apparatus, temperature, speed, and sampling times.
A Tip For Junior Analysts
Always discuss these points with the method owner, your team lead, or QA before starting it saves time and prevents compliance issues.
The following part is critical, because what analysts do before starting often determines if the test succeeds or fails.
Preparing for the Test
Proper preparation ensures accuracy, repeatability, and regulatory compliance.
Here’s what every QC or R&D analyst must check and set up before running a dissolution test.
Selecting the right dissolution apparatus
| Apparatus | Typical Use | Notes |
| Apparatus 1 (Basket) | Capsules, floating tablets | Needs correct basket mesh size (commonly 40 mesh). |
| Apparatus 2 (Paddle) | Immediate-release tablets | Most common; avoid coning. |
| Apparatus (Reciprocating Cylinder) | Modified-release or delayed-release | Less common; programmable dip rates. |
Choosing dissolution media
- Type: Water, simulated gastric fluid (pH 1.2), phosphate buffer (pH 6.8), acetate buffer, surfactants (e.g., 0.1% SLS) if required.
- Volume: Usually 500, 900, or 1000 ml.
- Preparation: Measure pH carefully with a calibrated pH-meter, Read this interesting article about pH-meters and their essential roles.
Important Tip
Use freshly prepared or properly stored media; check expiry per SOP.
Degassing the media
Air bubbles can:
- Form on tablets, slowing dissolution.
- Create noisy or low readings.
Common degassing methods:
- Vacuum filtration with gentle stirring.
- Sonication.
- Heating and cooling.
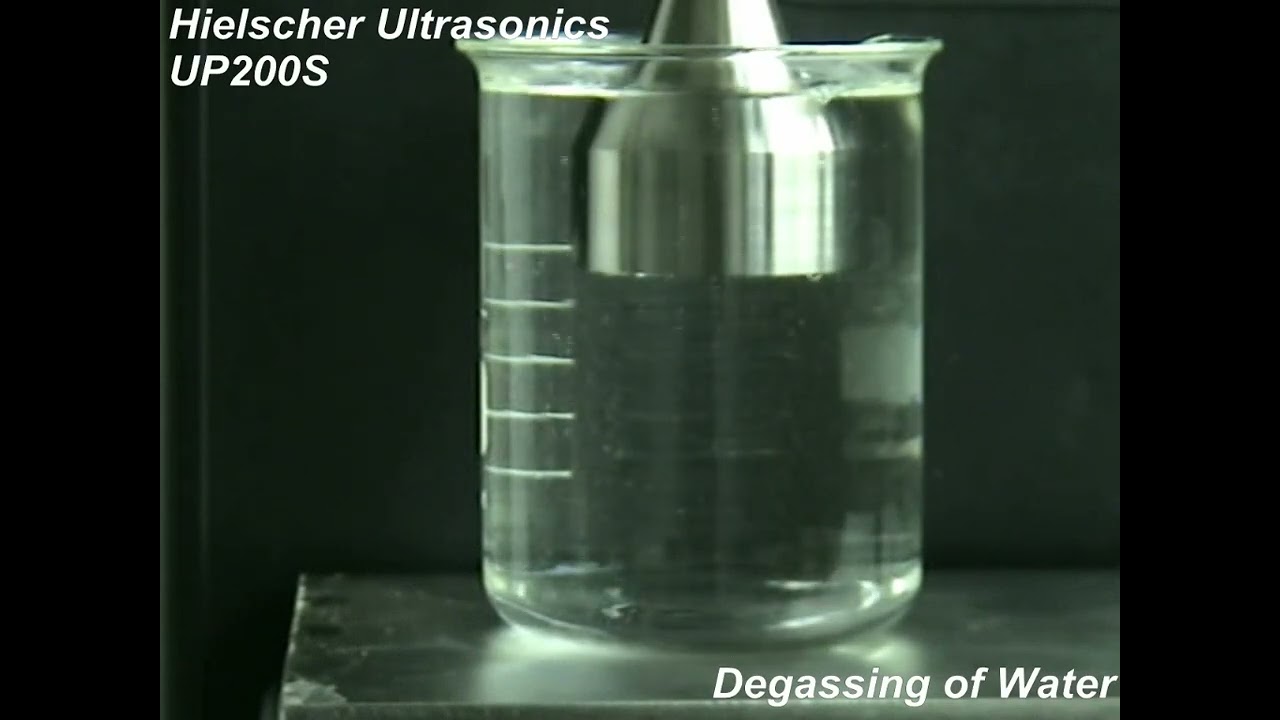
Important Tip
Verify pH after degassing; temperature changes can shift pH.
Setting volume & temperature
- Target temperature: 37 ± 0.5 °C.
- Confirm with a calibrated digital thermometer before and during the run.
- Check volume in each vessel with a graduated cylinder.
Equipment suitability & calibration checks
Before starting:
- Verify RPM: check speed with a calibrated tachometer.
- Centering & alignment: vessels and paddles/baskets must be centered (use centering gauge).
- Shaft height: measure from the paddle/basket to vessel bottom.
- Apparatus suitability: run a performance verification test (e.g., USP prednisone tablets for Apparatus 2) periodically. According to USP General Chapter 711
- Document each check in calibration logs or batch records
Best practice tip:
Make and use a pre-run checklist: media, temperature, apparatus checks, sinkers, sampling schedule, filters, and pH verification.
Dissolution Sample Preparation
Reference Standard Handling
- Use the official reference standard from USP, EP, or your qualified supplier.
- Record:
- Batch/lot number
- Potency (often given as % or “content”)
- Expiry date
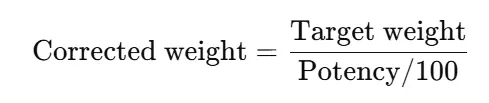
- Calculate corrected standard weight if potency ≠ 100%:
- Use an analytical balance (0.1 mg readability or better); always calibrate before weighing.
- Store the standard in original packaging; protect from light and humidity as required.
- Prepare fresh standard solution daily or as mentioned in the validated method.
Sample Preparation
- test usually 6 units per batch (sometimes 12 for Stage 2 or variability studies).
- Handle tablets/capsules carefully:
- Avoid chipping, cracking, or removing the coating.
- If the product has special storage conditions (e.g., moisture-sensitive, refrigerated):
- Remove only when ready to test.
- For modified-release forms, confirm identity and batch details.
- Keep backup units in case of invalid runs.
Labeling & Documentation
- Each vessel/sample must be labeled clearly:
- Product name, strength, lot number
- Vessel number (1–6 or 1–12)
- Test date and analyst initials
- Document in the dissolution log/batch record:
- Apparatus type, RPM, media, volume, temperature
- Sampling time points
- Standard preparation details (weight, dilution, potency correction)
- Any deviations or observations (e.g., floating tablets)
Equipment & Accessories Check
Before running the test, verify you have:
- Clean, labeled volumetric flasks and pipettes
- Suitable filters (type, pore size)
- Sinkers if needed
- Calibrated pH meter
Practice Tip
Set everything on a dedicated clean area or bench to avoid mix-ups, also Use a pre-made worksheet to track weights, corrections, dilutions, and sampling times this saves time and reduces calculation errors.
Equipment Checks Before Running
RPM (Rotation Speed) Verification
- Use a calibrated tachometer (contact or optical type).
- Measure at the target speed (e.g., 50, 75, or 100 rpm).
- Acceptable tolerance: usually ±4% or as per method/SOP.
- Record the actual speed and date in the calibration log.
Even small speed deviations can greatly change dissolution results, especially for the paddle (Apparatus 2).
Centering & Alignment
- Use the centering gauge supplied with the dissolution tester.
- Confirm:
- The shaft is vertically centered in the vessel.
- Basket/paddle does not touch the vessel walls.
- Correct any misalignment before starting.
Misalignment leads to uneven hydrodynamics and poor repeatability.
Shaft Height (Depth)
- Use the height adjustment tool or ruler provided.
- Typical distance:
- Paddle/basket: 25 ± 2 mm from the inside bottom of the vessel (check method).
- Verify each position (all 6 or 12 vessels).
Temperature Check
- Target: 37 ± 0.5 °C.
- Use a calibrated digital thermometer:
- Check the temperature of the dissolution media in each vessel before starting.
- For long runs, check periodically or confirm with bath temperature.
Cleanliness & Condition Check
- Ensure vessels, paddles, and baskets are:
- Free from scratches, residue, or corrosion.
- Cleaned, rinsed, and air dried.
- Inspect baskets for:
- Broken wires
- Deformation or discoloration
Documentation & Traceability
- Record all checks on:
- Calibration log sheets
- Daily verification checklists
- Batch records or LIMS
- Include:
- Analyst initials
- Date & time
- Instrument ID or serial number
Running the Dissolution Test
Placing Dosage Forms Correctly
- Handle tablets/capsules gently, using forceps or gloves (to avoid moisture and fingerprints).
- Place each unit quickly but gently in the center of the vessel bottom:
- Paddle (Apparatus 2): directly on the vessel bottom.
- Basket (Apparatus 1): Place in the basket; ensure it doesn’t chip or break.
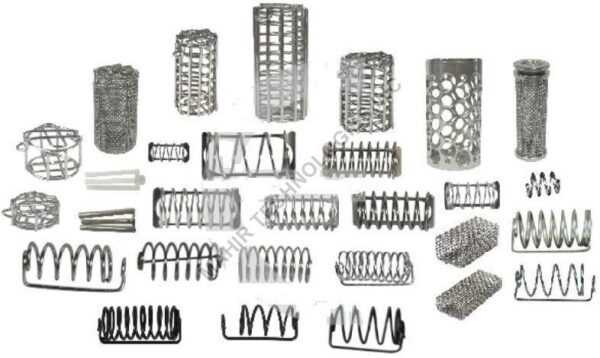
- For floating dosage forms:
- Use approved sinkers (e.g., helical wire sinkers).
- Start timing immediately after placing the last unit.
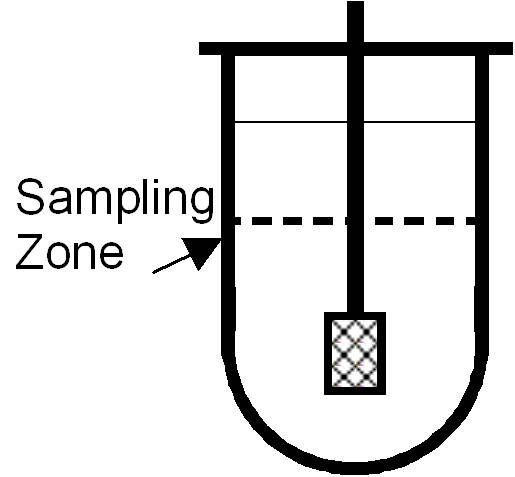
Sampling Procedure
- Time points: Typical for immediate-release: 5, 10, 15, 30, 45, 60 minutes (follow method/SOP).
- Volume: Withdraw a precise volume (e.g., 10 ml).
- Use a manual cannula or automated sampler:
- Place cannula halfway between the paddle and the vessel wall, ~1 cm below the surface.
- Replace withdrawn volume immediately with fresh pre-warmed media.
- Avoid disturbing hydrodynamics:
- Remove sample slowly.
- Keep cannula fixed during withdrawal.
Filtration
- Filter each sample immediately to remove undissolved particles.
- Use filters:
- Typically 0.45 µm or 0.8 µm.
- Validate filters: ensure they do not adsorb the drug.
- For sticky or poorly soluble drugs:
- Rinse filter with small volume of fresh media (optional; follow SOP).
Handling Delayed- or Extended-Release Products
- Use method-specific sampling times (e.g., 1, 2, 4, 6, 8 hours).
- Keep apparatus running throughout test.
- For long runs:
- Check temperature periodically.
- Top up media to maintain volume, if evaporation occurs (follow SOP).
Observations & Deviations
During the run, document:
- Floating, sticking, or coning.
- Media clarity, foaming, air bubbles.
- Any equipment alarms or interruptions.
- Environmental factors (e.g., temperature deviations).
Analysis
Sample Treatment Before Measurement
- Dilution: Dilute aliquots if absorbance or detector response is above linear range.
- Use volumetric flasks or calibrated pipettes for dilution.
- Mix thoroughly; avoid bubbles.
- Filtration: Already done during sampling — but re-filter if sample sat too long or precipitate forms.
Quantitative Measurement
UV-Visible Spectrophotometer
- Most common for immediate-release tablets.
- Choose wavelength from validated method (e.g., λmax of drug).
- Use quartz cuvettes; keep them clean and dry.
- Blank with dissolution media.
- HPLC (High Performance Liquid Chromatography)
- Used when:
- Formulation contains interfering excipients.
- Low concentrations.
- Modified-release products.
- Follow validated method:
- Column type and dimensions.
- Mobile phase composition.
- Flow rate and injection volume.
- Document system suitability: e.g., tailing factor, theoretical plates, resolution.
Plotting Dissolution Profile
- Plot % dissolved vs. time for each unit.
- Calculate
- Mean, standard deviation, RSD.
- f2 similarity factor (if comparing profiles).
Calculations & Data Processing
Calculate %Dissolved
For each time point and unit:
If you diluted:
- Multiply by dilution factor.
- Apply potency correction of the reference standard, also add water content of the reference standard to the equation.
Correct for Media Replacement (Cumulative Calculation)
When you replace withdrawn sample volume with fresh media, adjust for the dilution effect:

- Qn: cumulative % dissolved at time n
- Cn: concentration at time n
- Vs: sample volume
- V: total media volume
- you can also calculate the drug release using our accurate % release calculator:
Calculate Mean & Variability
For each time point:
- Mean % dissolved (n=6, sometimes n=12)
- Standard deviation (SD)
- Relative standard deviation (RSD)
Compare Against Acceptance Criteria
As stated by USP pharmacopoeia :
- Stage 1: test 6 units; all must be ≥ Q + 5%.
- Stage 2: if Stage 1 fails, test 6 more; follow combined criteria.
- Confirm if test passes or fails.
Dissolution Profile & Statistical Comparison
- For R&D, bioequivalence, or stability:
- Plot dissolution profile (% dissolved vs. time).
- Calculate:
- f2 similarity factor (to compare two profiles):

Where Rt and Tt: reference and test % at specific time interval
you can easily and accurately calculate similarity factors using our calculators:
Troubleshooting Common Issues
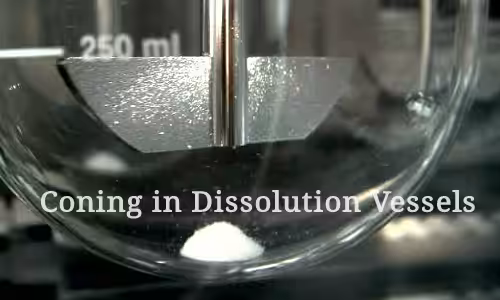
Coning & Mounding
What it is: Powder or fragments pile up under paddle or basket, reducing contact with media.
Causes:
- RPM too low (often below 50 rpm).
- Highly soluble tablets disintegrate too fast.
- Improper vessel centering.
- Overfilled or underfilled media.
- Solutions:
- Increase speed (as per method, e.g., from 50 to 75 rpm).
- Check vessel centering and paddle/basket height.
- Use sinkers for buoyant tablets.
- Confirm media volume is correct.
Air Bubbles on Dosage Form
What it is: Small air bubbles stick to tablet/capsule surface, slowing dissolution.
Causes:
- Inadequate degassing.
- Rough tablet surface traps air.
Solutions:
- Degas media properly (vacuum, sonication).
- Tilt vessel gently before test to release trapped air.
- Use surfactant-containing media if validated.

Unexpected Low Results
Causes
- Incorrect RPM or temperature.
- Wrong standard potency or calculation error.
- Adsorption on filter.
- Floating tablets.
Solutions:
- Verify RPM with tachometer; temperature in all vessels.
- Recheck standard preparation & calculation sheets.
- Validate filter recovery.
- Use sinkers.
Unexpected High Results
Causes:
- Sample contamination.
- Incorrect dilution (missed or double).
- Evaporation increases concentration.
Solutions:
- Check for contamination of vessels or pipettes.
- Recalculate; confirm dilution factors.
- Cover vessels to reduce evaporation; check volume after test.
Poor Repeatability / High RSD
Causes:
- Inconsistent sample handling or timing.
- Non-uniform tablets/capsules (content or hardness variation).
- Equipment misalignment or damaged baskets.
Solutions:
- Improve technique: sample consistently, keep cannula fixed.
- Use Stage 2 (12 units) if high variability persists.
- Inspect equipment; run system suitability test.
Sticking or Floating Dosage Forms
Causes:
- Low density tablets.
- Surface tension effects.
Solutions:
Use sinkers (helical or double-wire).
Adjust method (sometimes basket instead of paddle).
Useful Appendices / Downloads
Sample SOP Template for Dissolution Testing
- Title & scope
- Responsibility
- Step-by-step procedure:
- Preparation, equipment checks, running the test, sampling, filtration, calculations, reporting
- Deviation & troubleshooting section
- Revision history and approval signatures
Calibration & Verification Log Sheet:
- Columns for:
- Date
- Equipment ID / serial number
- RPM measured vs. target
- Temperature measured vs. target
- Centering and shaft height check
- Analyst initials
- Space for reviewer signature
Pre-Run Checklist:
- Media preparation & degassing
- Apparatus selection & verification
- Reference standard prep
- Sampling schedule ready
- Sinkers/filters prepared
- pH and temperature check
Observation & Deviation Log:
- Table to note:
- Time
- Observation (e.g., floating, sticking, foaming)
- Action taken
- Analyst & reviewer initials
Conclusion: Precision, Consistency, Compliance
Performing a dissolution test isn’t just about following numbers and steps — it’s about understanding why every step matters, from degassing media to checking RPM, sampling precisely, and documenting carefully.
By applying:
- Careful equipment setup and verification
- Standardized sample preparation
- Validated analytical methods
- Transparent calculations and thorough documentation