
Introduction
Whether you are developing an immediate-release tablet or a complex modified-release formulation, a well-designed dissolution method serves multiple purposes: it supports formulation optimization, enables quality control, and provides key data for regulatory submissions in line with USP, FDA, WHO, and ICH requirements.
However, developing a robust dissolution method isn’t just about picking an apparatus and pressing “start.” It’s a strategic process that blends scientific understanding with regulatory compliance, requiring careful attention to media selection, apparatus choice, agitation speed, sink conditions, and discriminatory power.
This guide will walk you step-by-step through the development and optimization of a dissolution method for oral dosage forms, using a practical and illustrative approach tailored to both formulation scientists and analytical chemists.
Before we go, if you haven’t taken a look at the first 2 parts of this series, here they are: dissolution test for beginners and Dissolution test part 2
Scope
This guide focuses on solid oral dosage forms, tablets, capsules, and multiarticulate covering:
- Pre-development considerations from the formulation perspective.
- Selection and preparation of dissolution media.
- Apparatus choice and parameter optimization.
- Method validation aligned with official guidelines (USP, FDA, WHO, ICH).
- Troubleshooting and fine-tuning for method robustness.

Define the objective
Why start here?
A well-focused dissolution method begins with clarity on what decision the method is intended to support. Is it a QC release test, a stability assay, a bio-predictive method for IVIVC/BE, or a discriminating formulation screen? The method design choices and acceptance criteria follow directly from that decision. The regulatory guides (USP <1092>, FDA dissolution guidance, and ICH Q8) emphasize starting from the product profile.
Actionable checklist: define the method’s purpose (do this first)
- State the single primary decision the test must support (pick one):
- Routine QC release (batch release),
- Stability testing,
- Comparative testing (bioequivalence / generic),
- Biopredictive/IVIVC for formulation development.
Why: different purposes require different discriminatory power and different validation emphasis (e.g., QC favors robustness; IVIVC favors biorelevance).
- Write the QTPP summary (one paragraph): dosage form, route, strengths, immediate/modified/delayed release target, target patient population, and clinical performance attributes you must preserve. (Use ICH Q8 language: link design to QTPP/CQAs).
- List the CQAs that the dissolution method must detect (examples):
- % release at defined times (e.g., Q at 30 min), t50% shift > X%, critical peak separation for multi-actives, effect of coating weight ±Y%.
Why: CQAs define what the method must be discriminatory for — choose the smallest change you need to detect.
- % release at defined times (e.g., Q at 30 min), t50% shift > X%, critical peak separation for multi-actives, effect of coating weight ±Y%.
- Decide acceptance decision framework up front: Will you use a compendial Q (S1/S2/S3) release plan, a fixed QC spec (e.g., Q = 80% at 30 min), f₂ profile similarity for comparability, or product-specific statistical limits? Note: FDA acceptance & BE waiver options are described in their guidance (useful when deciding whether dissolution alone can serve as surrogate data).
Data & inputs to collect before any experiment
Collect these minimum data points (don’t skip — they drive media and apparatus choices):
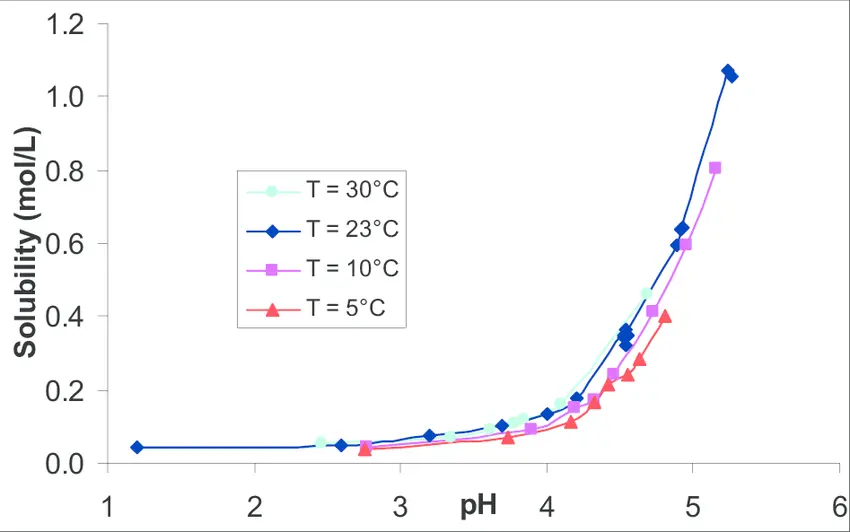
- API solubility vs pH (plot solubility at pH 1.2, 4.5, 6.8; include surfactant screens if needed).
- Why: to select media and check sink conditions (USP recommends aiming for sink ≥3× the volume required to dissolve the API amount).
- Dose strengths to be tested (including the highest strength use highest to confirm sink.)
- pKa and logP (to predict ionization/partitioning behavior that affects release).
- Formulation attributes: target disintegration (IR vs MR), coating type, polymer types, granule/salt forms, critical process variables.
- Stability in potential media: short-term stability of API & formulation in chosen media at test temperature.
Example QTPP → method implication (practical)
QTPP: Immediate-release tablet; dose 100 mg; rapid onset desired (t50 < 30 min) → Method implication: Start with Apparatus II (paddle), 900 mL phosphate pH 6.8 (if sink), 50 rpm, sample times 5/10/15/30/45 min; assay validated for UV/HPLC. If sink not met at pH 6.8, evaluate 0.1 N HCl or add minimal surfactant and justify.
Step 2: Gather Pre-work (Physicochemical & Formulation Data)
Why this matters:
Before even touching the dissolution apparatus, you need a complete understanding of the drug substance and formulation. Dissolution method success depends heavily on knowing how the drug behaves in different environments. This step prevents wasted trials and ensures that your initial conditions are scientifically justified.
Key Parameters to Collect:
- Solubility vs pH Profile
- Measure equilibrium solubility across the physiological pH range:
- pH 1.2 (gastric fasted)
- pH 4.5 (transitional)
- pH 6.8 (intestinal fasted)
- Reference: USP <1092> recommends selecting a medium based on solubility–pH data to ensure sink or supersink conditions.
- Sink condition definition (USP): Volume of medium should dissolve ≥3× the highest dose unit strength.
- Measure equilibrium solubility across the physiological pH range:
- pKa and Ionization
- Helps predict solubility and permeability changes with pH.
- Weak acids → more soluble at higher pH.
- Weak bases → more soluble at lower pH.
- Reference: ICH Q6A emphasizes understanding ionization for discriminatory method selection.
- Dose/Solubility Ratio (Critical for sink check)
- Formula:

- If >1/3 of vessel volume → sink not achieved; may need surfactants, pH adjustment, or larger volume
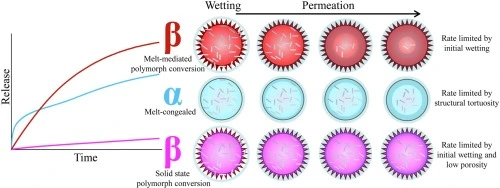
- Polymorph & Salt Form
- Different polymorphs can have different dissolution rates even with identical composition.
- Salt forms may alter pH-dependent solubility.
- Reference: FDA Dissolution Methods Database — review if a method already exists for your API form.
- Dose Strength Range
- Consider all marketed strengths during method design to ensure a single method works for all.
- If not feasible, justify separate methods in the regulatory submission.
Actionable Workflow
Step 1: Retrieve solubility-pH profile from literature, internal reports, or experimental measurement (shake-flask or miniaturized method).
Step 2: Compare to target dissolution volumes (500 mL, 900 mL, 1000 mL) to check the sink condition.
Step 3: Document dose/solubility ratios and note whether surfactants or pH adjustments may be required.
Step 4: Record polymorph, salt form, and particle size data for use in later discrimination tests.
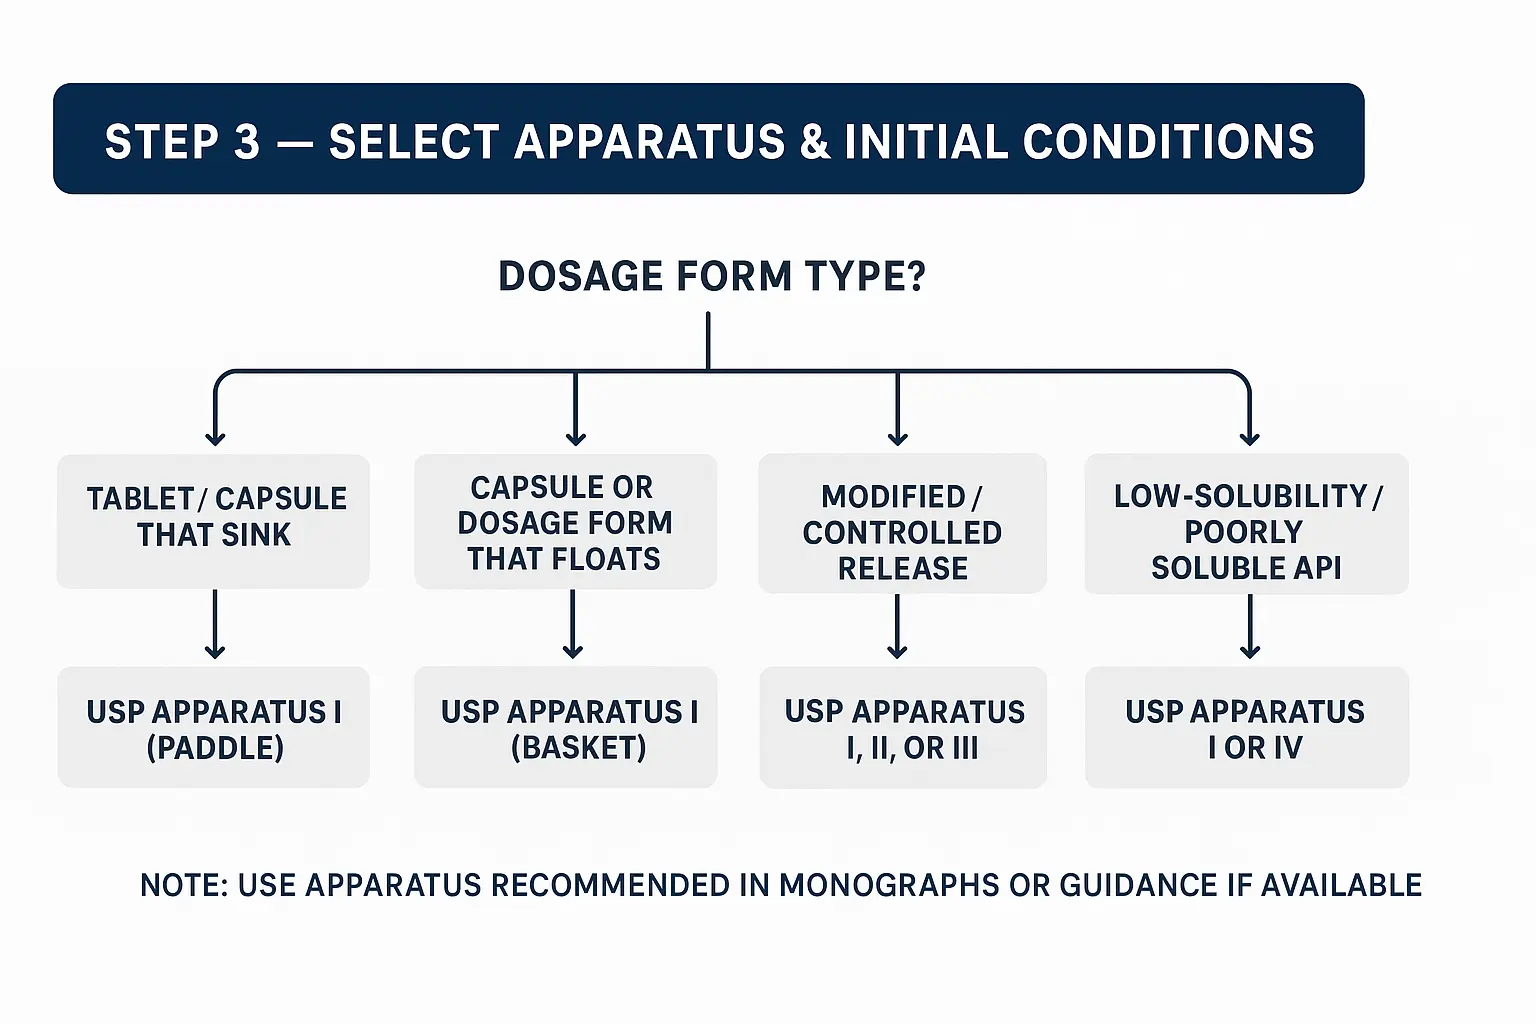
Step 3: Select Apparatus & Initial Conditions
Goal: choose the USP apparatus and a set of conservative, scientifically justified starting conditions that are appropriate for the dosage form, API properties, and the method purpose (QC vs development). These initial choices are what you will screen and optimize in later steps.
1) Quick decision map
- Dosage form type?
- Tablet / Capsule that sinks → start with USP Apparatus II (Paddle).
- Capsule or dosage form that floats → consider USP Apparatus I (Basket) or use sink guards/weights.
- Modified/controlled release (multiparticulate, pellets, bead-filled) → consider Apparatus I, II, or III (reciprocating cylinder) depending on manufacturer examples; for sustained release, App III or App IV may be better for discriminatory/biorelevant testing.
- Low-solubility / poorly soluble API → App II generally OK, but consider App IV (flow-through cell) for discriminating poor solubility/very low dose forms or for IVIVC work.
- Implants/ophthalmic/other special forms → use the apparatus recommended in compendia or specialized literature (App V–VII for specific cases).
- Core starting conditions (conservative, commonly used): These are typical starting points used in QC and method development. Always confirm with the USP monograph if one exists.
- Immediate-release tablets/capsules (typical QC start):
- Apparatus: USP II (Paddle)
- Vessel volume: 900 mL (common default), 500 mL acceptable for some methods if sink proven.
- Temp: 37.0 ± 0.5 °C
- Agitation: 50 rpm (start here; 75 rpm for some sticky/slow systems)
- Sampling times (IR example): 5, 10, 15, 20, 30, 45 min (adjust based on target Q)
- Notes: Use basket (App I) at 100 rpm for floating or fragile capsules.
- Floating tablets / soft capsules:
- Apparatus: USP I (Basket) 100 rpm
- If using App II, use sinkers or weights for floating tablets and document justification.
- Modified / Extended Release (ER / SR) dosage forms:
- Apparatus: Start with USP II (Paddle) or App I based on product design; consider App III or App IV for complex release mechanisms.
- Agitation: 50–100 rpm depending on product; choose milder conditions that still discriminate (do not over-force release).
- Sampling: longer timepoints (e.g., 1, 2, 4, 8, 12, 24 h) depending on label claim.
- Poorly soluble APIs / Low-dose products:
- Apparatus: App II is common; consider App IV (flow-through) if you need very small volume/flow control or IVIVC.
- Volume: 900–1000 mL typical, but ensure sink (≥3× dose soluble). If not possible, add minimal surfactant and justify in the method.
- Surfactants: SDS, Tween, use the minimum concentration that produces sink; document justification and impact on selectivity.
- Multiparticulates / Pellets / Beads:
- Apparatus: App I or II; App III (reciprocating cylinder) often used for multiparticulates.
- Special handling: Use suitable screens to prevent pellet loss; ensure free movement.
- Immediate-release tablets/capsules (typical QC start):
- Vessel, placement & alignment
- Use matched, certified vessels and paddles/baskets (USP vessel grade).
- Confirm paddle height: 25 ± 2 mm from vessel bottom (or manufacturer tolerance). Misalignment causes variability.
- Check vessel centering and wobble, and replace warped vessels.
- Ensure paddle/basket immersion depth and level are consistent across runs.
- Temperature & deaeration:
- Temperature: maintain 37.0 ± 0.5 °C. Use a calibrated bath and log daily calibration.
- Deaeration: deaerate media by sonication, vacuum, helium sparge, or in-line degasser. Dissolved gas creates baseline noise and inconsistent flow.
- Agitation choices & their effects
- Lower rpm (e.g., 50 rpm): gentler, may better reflect in vivo, but slower release for some products.
- Higher rpm (e.g., 75–100 rpm): increases hydrodynamic shear, may speed dissolution and reduce discrimination for some formulations.
- Do not increase rpm simply to get faster release; choose rpm that provides discrimination appropriate for the method’s purpose.
- When changing rpm between screening and QC, document equivalence or revalidate.
- Sampling considerations & vessel volume
- Volume: 900 mL is standard (USP common default), choose based on sink and compendial guidance. Smaller volumes increase sensitivity to the dose/solubility ratio.
- Sampling method: manual vs autosampler ensures sample withdrawal removes the correct volume and replacement with pre-warmed medium to keep volume and concentration consistent.
- Sampling ports: Use ports recommended to minimize hydrodynamic disturbance.
- Start-up and equilibration:
- Equilibrate apparatus with medium at set temp and rpm for at least 15–30 minutes before placing dosage forms (or as validated).
- If switching media or method, perform gradual transitions and at least 10–20 column/vessel volumes equilibration before sampling.
- System suitability checks for apparatus (example)
- Before running samples, perform a quick system suitability:
- Run a reference tablet (or standard API powder) to check:
- Agitation consistency (compare reference Q at timepoint vs historical)
- Temperature stability
- Vessel/paddle alignment (consistent retention times)
- Record baseline and reference release ± acceptance limits.
- Common pitfalls & how to avoid them:
- Using incorrect vessel/paddle → always use USP-grade, record ID, and replacement dates.
- Floating tablets not secured → use basket or sinker; document use of sinker.
- Inadequate deaeration → causes noisy baselines/erratic sampling.
- Rapid solvent changes → when changing media for two-stage tests, do gradual changes and re-equilibrate.
- Ignoring sink checks → leads to underestimation of dissolution; perform dose/solubility calculation before finalizing volume.
Example starting condition table
| Dosage form | Apparatus | Volume (mL) | Temp (°C) | Agitation (rpm) | Typical sampling times |
|---|---|---|---|---|---|
| IR tablet (sink) | App II (Paddle) | 900 | 37.0 ± 0.5 | 50 | 5,10,15,20,30,45 min |
| Floating tablet / softgel | App I (Basket) | 900 | 37.0 ± 0.5 | 100 | 5,10,15,30,60 min |
| ER tablet / pellets | App II / App III | 900–1000 | 37.0 ± 0.5 | 50–100 | 1,2,4,8,12,24 h |
| Low-solubility API | App II or App IV | 900–1000 (check sink) | 37.0 ± 0.5 | 50–75 | 5,10,20,30,60 min (or as needed) |
Step 4: Choose Dissolution Medium & Justification
Objective: select one or more dissolution media that:
- (a) provide scientifically justified sink/recognition conditions for the API/formulation
- (b) are discriminatory for the CQAs you defined
- (c) are defensible for QC or development use (with clear rationale for regulatory reviewers).
Short rule
Start with physiology-relevant pH points (pH 1.2, 4.5, 6.8) and then adjust (add surfactant, change ionic strength or volume) only when justified by solubility or discriminatory needs.
- Typical media to consider (and why)
- 0.1 N HCl (approx. pH 1.2) simulates the stomach (fasted). Use for weak bases and early acid-stage tests.
- Acetate buffer pH 4.5 transitional stomach/upper intestinal region relevance.
- Phosphate buffer pH 6.8 simulates the small intestine (fasted) and is commonly used for QC of many IR products.
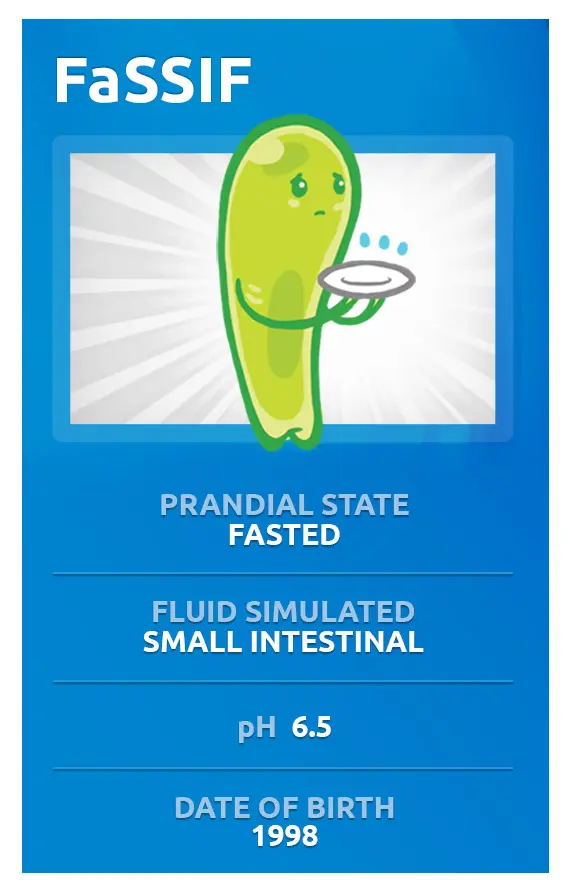
- Biorelevant media (FaSSIF / FeSSIF) for bio predictive/IVIVC work or to investigate food-effect mechanisms. Use when bio-relevance is the goal.
- Surfactant-containing media (e.g., 0.05–1% SDS or Tween 80) are used only when sink cannot be achieved in aqueous buffers or when API is very lipophilic. Use the minimum effective concentration and justify with data.
- App IV (flow-through) media for poorly soluble drugs where volume control and flow rate mimic GI absorption, or when continuous removal helps maintain sink.
- First, do the sink check (required)
- Sink condition target (practical): medium should dissolve at least 3× the highest unit dose (USP common guidance).
- Compute Dose/Solubility Ratio = Highest Dose (mg) / Solubility (mg/mL at chosen pH).
- Required vessel volume (mL) = Dose / (Solubility × 3).
- If required vessel volume > chosen vessel (e.g., 900 mL), sink not met → choose alternate medium, use surfactant, increase volume (if justified), or use flow-through approach.
- Practical order of experiments to select media
- Solubility screen: measure API solubility at pH 1.2, 4.5, 6.8.
- Dissolution quick-screen (single tablet × 3) in pH 1.2, 4.5, 6.8 (App II, 50 rpm, 900 mL, 37 °C) to see trends and whether early release is acceptable.
- If sink fails: screen surfactants (e.g., 0.02%, 0.05%, 0.1% SDS; or Tween 80 at low w/v) in the most relevant pH to find minimum concentration that achieves sink.
- Biorelevant test (optional, development): run FaSSIF/FeSSIF to assess food-effect/IVIVC potential.
- Document discrimination: intentionally vary a formulation factor (e.g., tablet hardness or coating weight ±10%) and check if candidate medium(s) detect the change.
- Rules for using surfactants (practical & regulatory)
- Use only when necessary. Surfactants change selectivity and can mask formulation differences.
- Pick the lowest concentration that achieves sink justify with solubility/dissolution data.
- Demonstrate selectivity: show that the medium with surfactant still discriminates relevant formulation changes.
- Document reproducibility across batches and filter compatibility (some surfactants clog filters).
- Two-stage (multi-media) testing when & how
When to use: enteric-coated or pH-dependent release products, or when in vivo transit is important.
Typical two-stage protocol example:
- Stage 1: 0.1 N HCl (pH 1.2) for 2 hours → Stage 2: transfer to pH 6.8 phosphate buffer (or simulate by adding concentrated buffer and adjusting pH).
- Consider compendial monographs and regulatory precedent
- If a USP monograph exists, start with the compendial medium and conditions unless there is a sound scientific justification to deviate.
- For generic/BE work, check FDA dissolution method expectations (e.g., whether f₂ will be used; whether dissolution alone is sufficient for BE waiver).
- For WHO-listed products or global filings, ensure medium choices are defensible across regions.
- Practical examples and recommended starting choices
- IR tablet, readily soluble at pH 6.8: start with pH 6.8 phosphate buffer, 900 mL, App II, 50 rpm.
- Weak base, dissolves in acid but precipitates in intestine: test pH 1.2 and two-stage acid→pH 6.8 to capture precipitation behavior.
- Very lipophilic, poorly soluble: perform solubility then test with low SDS (0.05%) in pH 6.8 OR consider App IV flow-through for sink maintenance.
- Filters and sample handling in different media
- Validate filters for adsorption in each medium tested (filter study per ICH Q2): compare filtered vs centrifuged samples (acceptance: typically within ±2%).
- Surfactant-containing media can form micelles affecting UV/HPLC baseline verify method specificity and baseline stability.
- How to justify the chosen medium in the report / regulatory dossier (template)
- Medium selection justification (example):
“Phosphate buffer pH 6.8 (900 mL) was selected as the primary dissolution medium because the API shows adequate sink at intestinal pH (solubility = X mg/mL at pH 6.8; Dose/Solubility ratio = Y, >3× sink achieved). Preliminary dissolution screening in pH 1.2, 4.5 and 6.8 showed highest discriminatory power and consistent release in pH 6.8. For development studies, FaSSIF was used to explore food effect. A surfactant (SDS 0.05% w/v) was evaluated; however, it was not required when using 900 mL volume. Filter compatibility and assay specificity were confirmed (filter recovery within ±2% and HPLC specificity established).”
- Medium selection justification (example):
Practical note
Include measured solubility values, dose/solubility calculations, discrimination test results, and filter-study evidence.
- Checklist — Medium selection & justification
- Solubility measured at pH 1.2 / 4.5 / 6.8 (documented).
- Dose/Solubility ratio calculated and sink check passed (or alternative justified).
- Quick-screen dissolution runs at candidate media completed (n ≥ 3).
- Surfactant screen performed (if sink not met) — minimum effective concentration recorded.
- Discrimination test performed (varying a formulation attribute) and medium chosen shows required discrimination.
- Filter compatibility study completed for each medium.
- Two-stage or biorelevant media documented & justified (if used).
- Compendial monograph or regulatory precedent checked and cited if available.
Step 5: Define Sampling Plan & Analytical Assay
This is the stage where you lock in how, when, and by what means you will measure your drug release. Your goal is to ensure that your dissolution data is accurate, reproducible, and free from artifacts introduced by sampling or analysis.
- 1. Time Points Selection
- Immediate-Release (IR):
- Early point (5–10 min), midpoint (~50% release), and plateau (Q value).
- Example: 5, 10, 15, 30, 45 min.
- Modified-Release (MR): Enough points to define the entire profile (typically 6–12 over the release period).
- Justification: Align with USP <1092> and regulatory expectations, enough points to model the curve, but not so many that variability increases.
- Immediate-Release (IR):
- 2. Sampling Volume & Medium Replacement
- Withdraw 1–5 mL for UV, or larger for HPLC, while maintaining sink conditions.
- If volume is significant, replace with fresh pre-warmed medium to maintain hydrodynamics and volume.
- Use volumetric correction in calculations when replacing medium.
- 3. Sample Handling & Filtration
- Filter Selection Study:
- Test ≥2 filter types (e.g., 0.45 μm nylon, PVDF, PTFE).
- Spike & recovery test: filter a known concentration and compare with the unfiltered.
- Choose the filter that ensures no drug adsorption or interference.
- Pre-rinse filters with dissolution medium to remove extractables.
- Avoid centrifugation unless justified (e.g., for very fine suspensions).
- Filter Selection Study:
- 4. Analytical Technique
- UV Spectrophotometry:
- Pros: Fast, low cost.
- Cons: Possible interference from excipients → must confirm specificity via ICH Q2(R1).
- Often requires blank correction from the medium.
- HPLC Assay:
- Pros: High specificity, suitable for multi-component formulations.
- Cons: More time and resources needed.
- Validate for accuracy, precision, linearity, and specificity.
- For both: define LOD, LOQ, and stability of the analyte in the medium.
- UV Spectrophotometry:
- 5. Assay Specificity
- Must confirm that the chosen analytical method measures only the API, without interference from excipients, degradation products, or medium components.
- Follow ICH Q2(R2) guidelines for validation parameters.
Step 6 — Quick screening (light DoE/factor sweep)
Purpose:
Rapidly identify which experimental factors (medium, rpm, apparatus, volume, surfactant) have the largest influence on the dissolution response (t10/t50/t80 or % released at a target time). Use the results to select 1–2 promising method conditions for deeper optimization and validation.
Why use a light DoE?
- Faster and more informative than one-factor-at-a-time.
- Reveals interactions (e.g., rpm × medium) that could hide important effects.
- Keeps experiments minimal while giving statistically useful results.
- Decide the screening objective & responses
- Pick 1–3 measurable responses you will use to judge each run. Typical choices:
- % released at a defined time (e.g., %Q at 30 min for IR)
- t50 (time to 50% release) or t10 / t80
- Variability (RSD) across replicates method must be reproducible
- A discrimination metric e.g., difference in %Q between a control and deliberately stressed formulation
- Pick a primary response (e.g., Q30%) and keep others as secondary.
- Pick 1–3 measurable responses you will use to judge each run. Typical choices:
- Choose factors and levels (keep it small)
- Common screening factors and example two-level choices:
- Medium: pH 6.8 phosphate vs pH 1.2 (or include surfactant level)
- Agitation (rpm): 50 vs 75 rpm
- Apparatus: App II vs App I (if floating suspected)
- Volume: 500 mL vs 900 mL (if sink borderline)
- Surfactant: none vs 0.05% SDS (only when needed)
- Limit to 3–5 factors for a quick screen.
- Common screening factors and example two-level choices:
- Pick a design (practical recommendations)
- 3 factors: use a full factorial (2³ = 8 runs).
- 4–5 factors: use a fractional factorial (2⁴ or 2⁵ with resolution IV) to keep runs reasonable (8–16 experiments).
- Replicates: run n = 3 tablets per condition (minimum) to estimate variability. If throughput allows, replicate the center point(s).
- Blocking / randomization: randomize run order and if you must run on different days/plates, use blocks and include at least one replicate of a reference (control) condition per block.
- Prepare controls and discrimination checks
- Control formulation: the intended / “nominal” tablet. Use it in multiple runs to estimate system noise.
- Deliberate small change: include one stressed formulation (e.g., hardness +10% or coat +10%) to test if a candidate condition can detect it. This is your discrimination test.
- Data handling and simple analysis (what to do in Excel / any stats software)
- Data handling and simple analysis (what to do in Excel / any stats software)
- Calculate primary responses for each replicate (e.g., %Q@30, t50 via interpolation).
- Summary table: mean, SD, RSD for each condition.
- For factorial analysis: compute main effects and two-factor interactions (use simple contrast calculations if using basic Excel, or run two-way/ANOVA in more advanced software).
- Decision rules:
- A factor with a large main effect on the primary response (e.g., changes %Q by >10% absolute) is influential.
- If a factor reduces variability (lower RSD across replicates), that favors its level for QC use.
- If a candidate condition detects the deliberate stressed formulation (statistically significant difference vs control), it passes the discrimination test.
- Graphical evaluation (strongly recommended)
- Main effects plot: mean response at each level of each factor is visual and fast to interpret.
- Interaction plot: lines crossing indicate interactions; pay attention to rpm × medium, surfactant × medium.
- Boxplots or violin plots for replicate distributions per condition.
- Profile overlays: for key candidate conditions, overlay dissolution curves (mean ± SD) to visually assess discrimination.
- Decision criteria — choose candidate conditions
- Select 1–3 candidate conditions to move to optimization based on:
- Meets sink and practicality criteria (medium/volume feasible for QC).
- Provides required discrimination (detects small but relevant formulation changes).
- Reproducibility: acceptable RSD (typical targets: RSD ≤ 5% at plateau points; tighter for QC as needed).
- Minimal use of surfactant or extreme rpm unless required, prefer milder conditions that still discriminate.
- Select 1–3 candidate conditions to move to optimization based on:
- Example screening matrix (copy-pasteable)
| Run ID | Medium | rpm | Apparatus | Surfactant | %Q@30 mean (n=3) | SD | RSD% |
|---|---|---|---|---|---|---|---|
| A | pH 6.8 | 50 | App II | 0% | 78.2 | 1.8 | 2.3 |
| B | pH 6.8 | 75 | App II | 0% | 85.6 | 2.1 | 2.5 |
| C | pH 1.2 | 50 | App II | 0% | 90.0 | 3.2 | 3.6 |
| … | … | … | … | … | … | … | … |